Blog

  • Using git

    Git is …

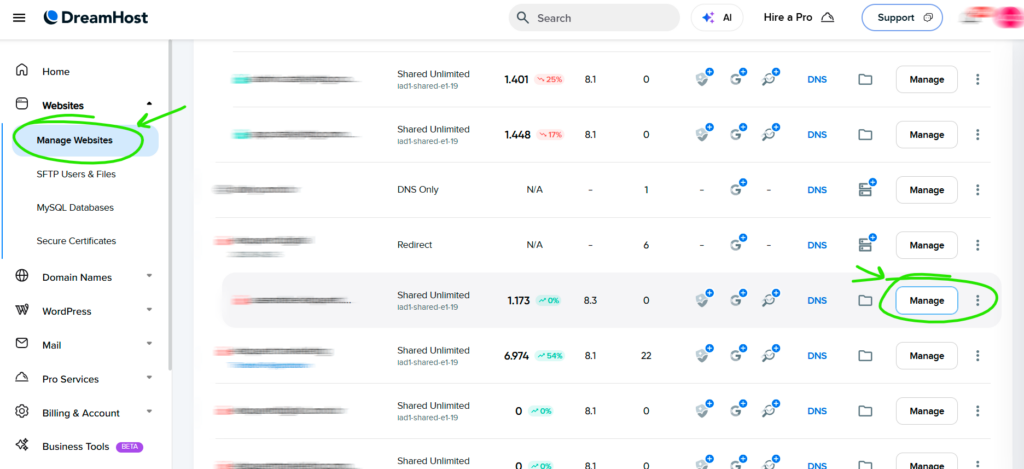
    Create the repo on GitHub

    1. Acesse github.com
    2. Clique no botão “New” (ou “Novo repositório”)
    3. Dê um nome para o projeto
    4. Marque a opção “Private” ou “Public”, dependendo do seu caso
    5. NÃO marque a opção para adicionar README, .gitignore ou licença (isso pode causar conflito com seu repositório local)
    6. Clique em Create repository

    On local project

    Abra o terminal (cmd, bash, etc.) e navegue até a pasta do seu projeto:

    cd /caminho/para/seu/projeto

    Se ainda não for um repositório Git:

    git init


    Adicione os arquivos:

    git add .

    Faça o primeiro commit:

    git commit -m "Primeiro commit"

    Branch

    git branch -M main

    Conecte ao repositório do GitHub

    Copie a URL do repositório que você acabou de criar (pode ser via HTTPS ou SSH).

    Exemplo HTTPS:

    git remote add origin https://github.com/seu-usuario/nome-do-repositorio.git

    Envie o projeto para o GitHub

    git push -u origin main

    Esse -u (ou –set-upstream) serve para ligar seu branch local (main) ao branch remoto (origin/main). A partir disso, o Git já sabe onde enviar por padrão.

    Now on just use

    git push

    or more complete in the cicle

    git add .
    git commit -m "mensagem do commit"
    git push

    git add .
    👉 Adiciona todas as alterações (novos arquivos, modificações, exclusões) para a área de staging.

    git commit -m “mensagem”
    👉 Salva essas alterações no histórico do Git local, com uma mensagem descritiva.

    git push
    👉 Envia seus commits locais para o repositório remoto (ex: GitHub).

    Se quiser, dá pra encurtar com um comando só (pra casos simples):

    git commit -am "mensagem"
    git push

    Esse -am combina add e commit, mas só funciona para arquivos que já estão sendo rastreados pelo Git (ou seja, não serve pra arquivos novos).

  • Change PHP settings in Dreamhost

    Normally you change PHP settings in a file called php.ini that PHP loads when bootstrap. In Dreamhost you use a file called “phprc” that resides in a sub-directory “/.php” in your user home.

    There is one folder for every installed PHP version.

    When you open the “phprc” file in a text editor you see some code there. This is manage by the server and will be overwritten if you put something there.

    Put your code after this part and save.

    After that you need to restart php. In Dreamhost shared you have to kill all running processes.

    Log in to your server and run the following code:

    killall -9 php84.cgi -u shelluser

    Change “php84” to right version and “shelluser” to username of website runs under. (the user you logged in ssh)

    Check with a phpinfo file

    Links:

    https://help.dreamhost.com/hc/en-us/articles/214894037-Create-a-phprc-file-via-FTP

    https://help.dreamhost.com/hc/en-us/articles/214200748-My-phprc-file-isn-t-updating#Update_your_phprc_file_in_your_panel

    https://help.dreamhost.com/hc/en-us/articles/214895287-Viewing-your-site-s-PHP-version-and-settings

  • Best PHP settings for WordPress

    Memory Limit

    WordPress can be very memory intensive, especially if you use a lot of plugins or a page builder. The WordPres default is 40MB for the frontend. In my experience thi is very small, even for basic websites. Set this to 256MB or more if you can or you could get the infamous “Fatal error: Allowed memory size exhausted” error very often.

    Upload Max File Size

    This values sets the maximum size of a file user can upload to media gallery. I usually set this to 64MB. If you will handle video upload, this value will need to be bigger.

    Post Max Size

    This must be equal or greater to upload_max_filesize so PHP can handle uploads properly.

    Max Execution Time

    How much time PHP will wait to a single script run. If it come to this value without finish the processing it returns a timeout error. I usually set this to 300s (5min) for development as I usually made some imports or longer updates. For production, 1 minute (60s) could be fine.

    Max Input Time

    How much PHP will wait for a file upload (or form submission). This correlates to your expected upload_max_filesize and user internet connection. For images, 60s can be enough. If you permit video or bigger files, set this to a longer value (5 or 10 minutes. 300 or 600 seconds, respectivelly).

    Max Input Vars

    This values sets the maximum number of variables PHP can receive in a single request. Page builders can use a lot. So set this to 2000 or more.

    So, until now we have a php.ini file like following:

    memory_limit = 256M
    upload_max_filesize = 64M
    post_max_size = 64M
    max_execution_time = 300
    max_input_time = 300
    max_input_vars = 3000

    OPcache Settings

    OPcache is a in memory cache. By default it loads PHP compiled code to memory and loads from than as needed in the program lifecycle.

    You can use a plugin to use OPcache to store WordPress Object cache (besides PHP cache), like Docklet. That way it works very similar to use something like memcached or redis cache.

    opcache.enable=1
    opcache.memory_consumption=128
    opcache.interned_strings_buffer=8
    opcache.max_accelerated_files=10000
    opcache.revalidate_freq=2

    TODO: include some more details of Docklet

    Its not working!

    Depending on your environment you will encounter some dificulties to change this values.

    By default, PHP load the php.ini files in configured directories.

    If you are running apache, you can try put the values in a .htaccess file in the root of your project.

    php_value memory_limit 256M
    php_value upload_max_filesize 64M
    php_value post_max_size 64M
    php_value max_execution_time 300
    php_value max_input_time 300
    php_value max_input_vars 3000

    Maybe your host prevents overrides. In this case you can talk to them. If they refuse to change, you can try to go with permitted value or change host for some VPS (TODO: include a link to how to wp on vps).

    Links:

  • Change PHP Version in Dreamhost

    To change the PHP version a website runs you can go to:

    In Dreamhost Panel:

    Manage Websites > Manage (on the line of desired website domain)

    In next screen go to:

    1. Click on the Settings tab
    2. Modify (on the PHP section)
    3. Choose the desired version in the dropdown menu
    4. Click the [Change PHP Version] button
    5. Confirm
  • Config WordPress behing a proxy (like Cloudflare)

    When WordPress is behind a proxy, like Cloudflare, that handles SSL and is hosted without a certificate, it can get infinite loop redirects.

    To solve this you can add following snipped in wp-config.php file.

    
    if (isset($_SERVER['HTTP_X_FORWARDED_PROTO']) && strpos($_SERVER['HTTP_X_FORWARDED_PROTO'], 'https') !== false) {
    	$_SERVER['HTTPS'] = 'on';
    }

    I think this setup is becoming so common this could be in wp-config by default.

    For more information you can see: https://developer.wordpress.org/advanced-administration/security/https/#using-a-reverse-proxy

  • Creating a new WordPress website using WPCLI

    First we need to download the core files:

    wp core download 

    Optionally you can pass attributes as language for example:

    wp core download --locale=pt_BR

    Not every shared hosting offer wpcli, but fortunally Dreamhost offer it by default. But when trying for the first time I encontered the following error:

    PHP Fatal error:  Allowed memory size of 134217728 bytes exhausted (tried to allocate 36864 bytes) in /usr/local/wp/php/WP_CLI/Extractor.php on line 100

    That means PHP get limit when tried to download and extract WordPress (128MB). So we need to increase the “memory_limit” argument in php.ini. Dreamhosts call this file as “phprc” and is located in a folder /home/username/.php/version. (eg: /home/useander/.php/8.2).

    So we need to know what version is currently in use by cli. The following command show exactly this:

    wp cli info

    Returns something like

    Shell:  /bin/bash
    PHP binary:     /usr/bin/php
    PHP version:    8.2.26
    php.ini used:   /etc/php82/php.ini
    MySQL binary:   /usr/bin/mysql
    MySQL version:  mysql  Ver 8.0.30-0ubuntu0.20.04.2 for Linux on x86_64 ((Ubuntu))

    We can see PHP 8.2 is in use. As in shared host we cannot directly change this php.ini file, we change the phprc file in our user directory, as demonstrated above.

    add the following in /home/yourusername/.php/8.2/phprc file

    memory_limit = 256M;
    • The file can already have some arguments. You can leave as is.

    Other way is to change the PHP version cp-cli uses. To do this you can add the follow line to the .bash_profile file in root of your user in Dreamhost.

    export WP_CLI_PHP=/usr/local/php83/bin/php wp

    Probably now you can run the command succesfully

    Now we need to create a wp-config file. the following command makes this.

    wp config create --dbname=NOME_DO_BANCO --dbuser=USUARIO --dbpass=SENHA --dbhost=localhost

    All ready for installation:

    wp core install --url=http://seusite.com --title="Título do Site" --admin_user=admin --admin_password=senha_segura [email protected]

    More info:

    https://help.dreamhost.com/hc/en-us/articles/214693248-WordPress-wp-cli-overview

    https://help.dreamhost.com/hc/en-us/articles/214200748-My-phprc-file-isn-t-updating#Update_your_phprc_file_in_your_panel

    https://help.dreamhost.com/hc/en-us/articles/214894037-Create-a-phprc-file-via-FTP